With the fairings ready to be sent off for painting once the Airtech upper fairing arrived, the spare motor ready to swap in and the shed cleared of crap, it was time to start the real work – removing the motor.
Reading the Haynes manual made it sound pretty easy – fairings off, airbox off, tank off, carbs off, radiator and cooling bits off, electrical connections off, undo a few bolts and the whole thing should just drop out, and then reverse the process to slot the new engine in. How hard could it be? The first part of this – stripping back components to get to the actual engine – was quite straightforward, and can be summed up by the following video…
Little did I know that this was about to be the start of a journey far bigger than I had ever intended.
“…you lost your way on that river as you would in a desert, and butted all day long against shoals, trying to find the channel, till you thought yourself bewitched and cut off forever from everything you had known once -somewhere- far away in another existence perhaps…”
Joseph Conrad, Heart of Darkness
To be fair, the Haynes manual (something Conrad’s Marlow never had) was pretty much spot on in that sense, and if it had been a case of removing the engine to replace it with exactly the same one then it would have been relatively straightforward.
It was at this point that I learned that although the 1990 and the 1993 (or thereabouts) engines were more or less the same, there were a few small but important differences.
First up, for some reason Yamaha decided to move from having an external oil cooler in 1990 (that looks like a miniature radiator) to having one that is integrated into the oil filter housing in 1991, and that used water from the radiator to circulate around the oil cooler to keep things under control. This water-cooled oil-cooler meant that the routing of water hoses from the radiator needed to be different to make the new engine compatible with the old radiator. For now, I parked that problem.

I will say that one of the great things about this project was that it forced me to get better at not having any answers. This was the first of several moments I had that made me realise that I genuinely had no idea of how to solve the problem, and that I needed to be cool with not knowing what the answer was straight away. I just kept reminding myself that it was a 1990 Yamaha, not a space shuttle, and that any problem I had faced had no doubt been faced, and solved, by someone other than me. That thought kept my anxiety at bay on many occasions when I realised just how far out of my depth I was.
The second problem was that once again the 1991 setup had slightly different routing of water pipes from the water pump in the engine to the radiator than the 1990 had, so once again there was a compatibility issue. This one at least seemed simpler – harvest the output housing from the old engine and bolt that on to the new engine and boom, compatibility issue solved.
The third problem was a biggie, and more than any other problem I faced made this project feel like I was pushing deeper into the unknown, into the jungle. It took me up a river, way up, looking for something without knowing what I’d do when I got there, but it was a situation where stopping was not an option.
One of the things I tried really hard to do, other than religiously tagging and bagging every part I took off, along with taking lots of pictures, was to test parts in the new engine as I took them off the old one. The new engine had the clutch all there, but it was missing a couple of parts that I needed to harvest from the old engine.
For those who haven’t seen how a 1990’s Yamaha 600 clutch works (assuming that is most of you), this is a quick summary:
- Your hand pulls the clutch lever on the handlebar like you would push your left foot down in a manual car;
- This pulls a cable which activates a little cam-driven pushrod down near your left ankle, pretty much pushing a small rod to the right as you pull the clutch lever;
- This little pushrod pushes a larger pushrod that goes all the way through to the other side of the engine, through one of the gearbox transmission shafts that is hollow;
- This pushrod pushes against a big plate (called the clutch basket) that is spring loaded to remain ‘in gear’, so as it is pushed by the rod it disengages, and voila – the drive is disengaged.
I didn’t even consider why the new engine didn’t come with the long pushrod that goes all the way through the engine. To this day I still don’t. Asking the seller seems pointless now, and an answer in any case wouldn’t change the situation and the road I’ve traversed since then.
To put it in simple terms, the pushrod from the old engine didn’t fit. It went most of the way through, but then somewhere inside the engine it hit up against a blocker. I could see all the way through from one side of the engine to the other, but the hole was a tad too small for the pushrod.
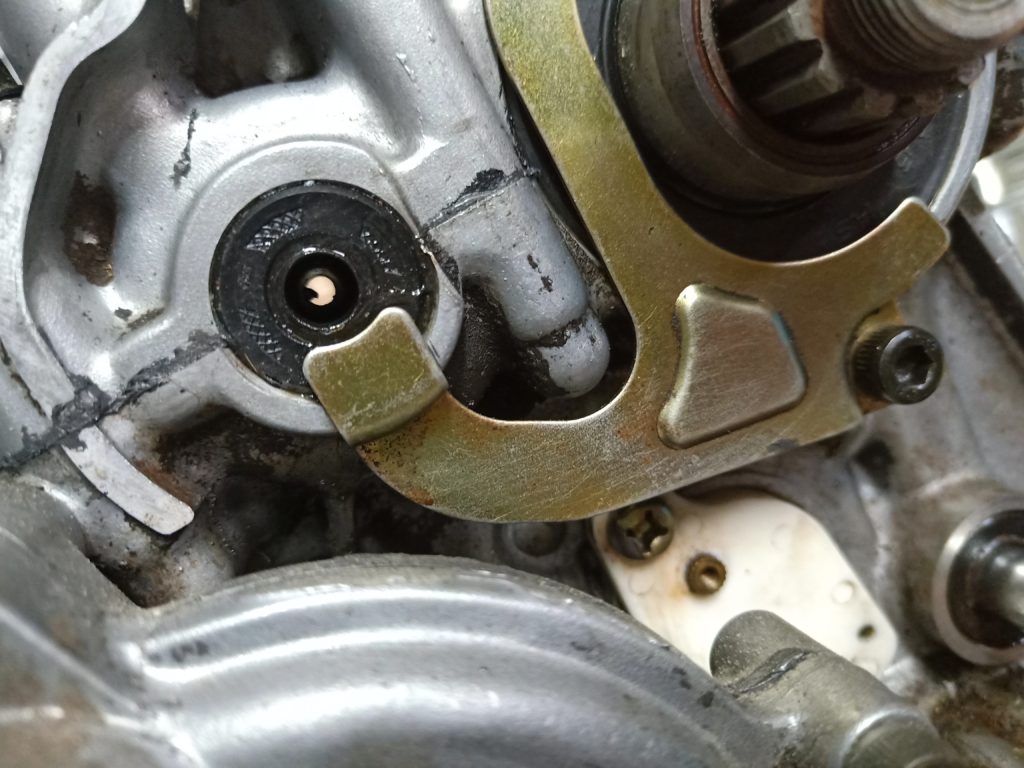
I checked the Yamaha parts sites, and according to them the pushrod and the other internals were the same regardless of the year. I asked the forums, and as helpful as they tried to be, they pretty much all told me that what I was saying was impossible – the pushrod had to fit through. I asked my man from The Motorcycle Society and he said the same thing – it’s probably just an oil seal blocking it, it had to fit through. I tried removing oil seals, tapping it with a hammer, swearing at it, because according to everyone and every bit of logic I could see, it had to fit.
And yet, it didn’t.
This was a massive problem. No pushrod going through, no clutch, and no engine. An absolute, rolled gold showstopper, and there was no point in being all cool about it like I had been with the oil cooler problem (which I did sort out later). This needed to be resolved, and the only way it could be resolved was to find and clear the blockage.
Now once again working on the assumption that nobody else has pulled one of these apart, I’ll give a general overview of where the blockage was sitting, specifically inside the crankcase. To get to the part, one would need to open up the crankcase, and to do this one would need to remove the cylinder block, and the head – in essence one would need to dismantle the entire engine…
This was not part of the plan.
I even went to the lengths of asking the local Yamaha dealership what they thought, and their response was predictable and was along the lines of ‘you bought an engine from a stranger off the internet and you’ve no idea what it’s like inside and you’re even contemplating bolting it straight in? Really?’
When I heard it put like that it did seem that my risk profile was slipping a little too much into the red zone, but that aside I thought I would try one last ditch tactic – drilling out the blockage. My thinking was that if the blockage only needed a half a mil or so more diameter to move smoothly then I might, might just get away with it. If there were only tiny bits of metal then they should end up in the oil filter before they do any internal damage. Gingerly I started to drill out the hole, until a little voice in my head chirped up:
‘Mate, you’re drilling into a machine that is going to be directly under your ass spinning at upwards of ten thousand revs per minute with you doing a hundred and something kilometres an hour to attempt to clear a blockage of unknown origins – does this seem like a good plan to you?’
I stopped, put the drill away, and resigned myself to a sobering fact – that I was no longer doing a straightforward engine swap.
I was doing a full rebuild.
Next up: Deconstruction